Tuesday 3 October 2017

Clinique: Moisture Surge Hydrating Supercharged Concentrate

I've been extremely lucky this year, and managed to squeeze in (and afford) three holidays this summer, but with the sun and flights, my skin has taken a bit of a battering! I knew I had to get something to sort my skin out before it got colder as my skin gets extremely dry during the winter, so I picked this gem up at duty free on my way home from Portugal as it worked out much cheaper than buying it in the UK!

It is described by Clinique as a 'supercharger water-gel hydrator' and claims to give dehydrated skin a 179% moisture boost, keeping skin hydrated for 24 hours. 

I've been using this most evenings and as my pre-makeup moisturiser for over a week now and I can already see the difference. It is slightly sticky at first but after a few minutes and once it has sunk in to the skin a bit, it feels light and refreshing. I much prefer a gel moisturiser, compared with creams as I find they tend to be a bit greasy on the skin. This works as a lovely base for foundation, with or without primer.


Sunday 17 September 2017

Fenty Beauty: Match Stix Shimmer Skinstick in Blonde

Along with the Fenty Beauty foundation (reviewed here), I also treated myself to one of the Match Stix Shimmer Skinstick - what a mouthful! I went for the shade Blonde, which is described as a glimmering gold. I love highlighters and usually lean towards more of a champagne toned highlighter so thought I'd go for something a bit more fun. I will also use this as an eyeshadow, and I love how multi-use these are. There are 10 shades of these available and some of the colours can be used as a blush or bronzer.

The formula of this one if pigmented, light and easy to blend. It'll also work great underneath a powder highlighter, to give a real eye-popping glow. The thing I really like about them is that they are magnetized so if you have more than one, you can keep them all together.

I like to put a little on my hand and then warm up with my fingers and pat on. You can then layer this up for a more dramatic look.

Fenty Beauty's description of the Shimmer Skinsticks is: "From low-key tangerine sheen to all-out violet iridescence, the ultra smooth, long wear formula is weightless, blendable, and lives to be layered, melting at first touch to a crease proof, powder soft finish."


Friday 15 September 2017

Fenty Beauty: Pro Filt'r Soft Matte Longwear Foundation in shade 310

After seeing so much positivity around Rihanna's makeup line Fenty Beauty, I knew I had to treat myself to a couple of bits from the range. The foundation has had beauty bloggers across the world raving about the range of shades and the formula so I decided I'd give it a go. Unable to visit Harvey Nichols (who currently have UK exclusivity of the range) I decided to buy online. After spending a long time looking online at Youtube videos and images for swatches and skin tones, I went for the shade 310, which is part of the 'Tan' range and has warm undertones.

This foundation is described as "a soft matte, longwear foundation with buildable, medium to full coverage". It comes in 40 shades and other brands seem to be following suit, with some of them now also offering a similiar shade range.

I was surprised at the thin consistency of the foundation when I first used it, but this means with such a pigmented formula, you get good coverage without a heavy or 'cakey' look. As with all foundations I have tried, it does darken once it's dried down on the skin, so this shade probably is the tiniest bit too dark (specially once my summer tan fades as winter approaches), but I know the next warm toned foundation would have been too light.

I also bought one of Shimmer Skinsticks in 'blonde' (see my next post). Lastly and importantly, Fenty Beauty is a 100% cruelty-free brand.


Have you tried any Fenty Beauty products yet? 


Sunday 27 August 2017

Urban Decay Naked Heat Palette & Fuel Vice Lipstick

I have been waiting for this palette to be released for months, and it was worth the wait. I don't have any of Urban Decay's other palettes as they have never really stood out to me - there was always a couple of shades that I knew I would never use and although they work out much more cost-effective than buying individual Urban Decay eyeshadows, I preferred to spend my money on the colours I knew that I would get good use from. However, as somebody who loves (all I wear) warm-toned eyeshadows, I knew that this was the one for me.


The Naked Heat palette includes 12 eyeshadows, with a mixture of shimmer and matte formulas, in a range of warm-toned orange and red based shades. This sounds super scary to the most experienced make-up buffs, but they are so gorgeous and the shade selection provides everything you need to create a summery sunset-inspired smokey eye, which has been everywhere this season. This palette really is FIIIIIYAAA ðŸ”¥

The formulas are creamy, pigmented and extremely easy to blend. If you're a fan of warm-toned eyeshadows, then I'm sure you'll love this palette as much as I do. These shades look great with every eye-colour and although I have dark brown eyes, I know orange and red tones really make those blue eyes pop!

I also love the packaging of this palette as it has a thick plastic casing, which makes it a lot more hard-wearing compared with the cardboard packaging like the other Naked palettes. Although it makes it heavier, it definitely feels more expensive. Another bonus is that the palette comes with a large mirror and a double-ended brush, which is handy and feels just as high-quality as their full-price brush range.

I have used this palette almost every day since I bought it, and have really enjoyed experimenting with colours that were initially a bit out of my comfort zone. I've been wearing these eyeshadows both in the office and out for cocktails, and you can definitely build them up for a bolder evening look.

I also couldn't resist one of the lipsticks in the collection, which is a limited edition peachy-nude in the shade 'Fuel', which compliments the bold colours in the palette extremely well. I've never been disappointed with Urban Decay products and this is no exception. The consistency is creamy and it's very pigmented, one swipe and you're ready to roll! 

Source: www.temptalia.com


What are your thoughts on this palette? What has your favourite Naked palette been?

Friday 25 August 2017

Iconic London Illuminator

Favourite highlighter of all time? I think so. When I saw an offer on Iconic London's site for £10 off, I knew I couldn't resist this little beauty any longer...


I hadn't heard of this brand until I saw it advertised on Instagram and although this product instantly stood out to me, I thought it was super pricey and as it is not stocked in any stores local to me I wasn't able to try before I bought, which is a major no-no for me usually. However, with the discount the usual £29.99 cost was brought down to £19.99 and that was enough to sway me, specially knowing pay-day was just around the corner.

This product is really versatile and can be added to moisturiser, primer or used on it's own for a magical gleaming glow, that I am sure was created by some kind of mythical creature (this is the only explanation). I bought the 'Original' shade, which is champagne toned, leaving a metallic golden sheen but there are three variations in total. 'Shine' is pink toned, leaving a pearly finish, which would be beautiful on fair skin tones and 'Glow' is a warmer terracotta tone, leaving a deep golden shine, which would be gorgeous on those of you with darker skin tones.

After a little bit of experimentation, my favourite way to apply this is to put a couple of drops (a little goes a loooong way) on to the back of my hand, swirl a small highlighter brush into the product, then I apply to the tops of my cheek bones, brow bones, cupids bow and along the centre of my nose. I then take a beauty blender and dab (no rubbing!) over the areas to blend into my skin. You can also easily build the intensity up if you're looking for a blinding glow.

Since I started using highlighters, I have always reached for powder products, but this is a game-changer and I can see why it has become a cult product in the beauty world. Using a liquid highlighter gives a more natural, dewy finish and I find it lasts longer than any of my powder products and blends much more seamlessly than a cream highlighter. You can even go in with a powder highlighter afterwards to set the liquid and create a budge-proof glow.


If this is still out of budget, I can recommend Topshop's Glow Liquid Highlighter in Phoenix, which is a great alternative, but not a complete dupe as it doesn't carry as much pigmentation or blend out as seamlessly. Apply the product in the same way I have suggested for the Iconic product and it will look gorgeous!

Tuesday 22 August 2017

L'Oreal Paris Paradise Mascara VS Too Faced Better Than Sex Mascara

I'd already heard so much about these mascaras before I bought each of them, but are they worth the hype? Let's find out!

Too Faced's Better Than Sex mascara has been around for some time longer than L'Oreal's Paradise range (featuring a new mascara) which only came out in the UK earlier this month after quickly becoming a blogger favourite in the US. I personally don't have a different mascara for the day and evening as I want my eyelashes to look as long as possible all day long!


I purchased the Too Faced mascara a couple of months ago after searching endlessly on Google for 2017's "Best Mascaras". This one came up in lists again and again so I took the plunge and bought the cheekily named mascara at my local Too Faced concession in Debenhams. I was initially really pleased with the effect - it was lengthening, volumising, didn't clump or smudge. However, one of the cons that I had noticed popping up in the reviews I'd read was that it dried up in the tube quite quickly, which I would have to agree with! Unfortunately, it doesn't go on to my lashes as smoothly anymore and it's a lot harder to work with. 

After hearing that L'Oreal's new mascara was a potential 'dupe' for TF's Better Than Sex mascara and almost half the price, I decided to give it a go. Although there are similarities with the packaging and brush (I am a fan of the bristle style wands), I wouldn't say they are a dupe, but I do in fact prefer the Paradise mascara! Again, it's lengthening, voluminising, doesn't smudge or flake and is a better 'wetter' (still quite dry) consistency compared my Too Faced mascara. I find it dries very quickly and therefore it's not very buildable - you have to work very quickly if you want to build it up as it sets pretty damn quick. It also contains some lash nourishing ingredients, including castor oil,  which is an added bonus! I can't comment on the 'curl factor' of either mascaras as I usually curl my lashes before applying, and I also recently treated myself to a pre-holiday LVL treatment, which keeps eyelashes permanently curled for up to 8 weeks.

So - Is Too Faced's much hyped mascara actually better than sex? I'd have to say no, unfortunately not, but if you're in the market for a fantastic, affordable mascara then I would highly recommend L'Oreal's latest offering. I know this is the one I will be reaching for every morning from now on...


Comparison of applicators: Top - Too Faced. Bottom - L'Oreal.
Have you tried either? What do you think?

Monday 21 August 2017

Soleil Tan De Chanel Bronzing Makeup Base

I am in love with this - I can't believe it has taken me so long to buy it...

This product is perfect for achieving the bronze goddess look that has been so popular this year. The creamy, almost mousse like consistency is a dream to blend and apply, resulting in the most gorgeous sun-kissed glow. It dries down slightly leaving a velvety finish and can be worn on bare skin, under or over your favourite foundation.


My favourite way to apply Chanel's Soleil Tan De Chanel is by using a firm synthetic makeup brush (I use Real Technique's Sculpting Brush). After I complete my pre-makeup routine (cleanser, moisturiser, primer) I apply my liquid foundation and concealer (Current favourites: NARS' Sheer Glow Foundation & Creamy Concealer). I then swirl the brush into the product and use a combination of patting on to the skin and gently blending on areas that would naturally be hit by the sun, like my cheeks and forehead. I personally avoid the nose as I like to use a contour and highlight to give the illusion of a slightly slimmer shape. I would definitely recommend applying this before any powder products, but have had no problems with applying powder over the top to set my makeup and I also use additional powder contour and bronzing products over the top to compliment my chosen look (see my Summer Look post here).

This also works amazingly as a transition between contoured areas. I use it to blur the lines of cream contour and create a super bronzed, glowy look. In the pan, the shade does look quite orange and slightly sparkly, which initially put me off. However, I am such a sucker for products that continuously get amazing reviews time after time, that this pay day, I decided to treat myself. I'm glad as I did as I have using it every day since I bought it and you get so much product for your money. Although it is pricey, it works out much cheaper per ounce than many other bronzers, so I'm hoping this little gem will last me a while.

The packaging looks like glass but is made from sturdy thick plastic, which I prefer as it's lighter for travel and means no sinking-heart feeling if you accidentally drop it! The lid features the famous gold Chanel logo, and looks gorgeous on my dressing table.

I would definitely recommend if you're looking for a luxury cream formula bronzer - it is beautiful!

Saturday 19 August 2017

FOTD - Summer Makeup Look

I'm all about bronzed glowy makeup this summer. I find that some makeup looks amazing on camera but in person, it's too heavy and looks harsh. With this in mind, I've put together a look that will take you from selfie to city. There is nothing better than that 'lit from within' look and I am confident that I've found products you will love. I have a little more time to get ready at the weekend and enjoy taking this time to experiment with new techniques and products. This weekend, I decided to experiment with combining cream, liquid and powder products and it's safe to say I'm a huge fan and this combination of formulas helped me to create a flawless result.


Product details: (exact match products or dupes are linked where possible)


Everybody has their own preferences in the order they apply their makeup, but mine always follows the same routine. Follow the below steps to get this look:
  1. I always start by cleansing my face then applying moisturiser, followed with primer.
  2. Apply foundation, concealer, cream contour/bronzing products (in this case MAC Pro Sculpting Cream as a contour, then blended out using Chanel's Soleil Tan De Chanel).
  3. Set with powder and apply powder contour/bronzer products.
  4. Use beauty blender to apply liquid highlighter to tops of cheek bones, eyelids, brow bone and along the nose, setting with a light dusting of powder highlighter.
  5. Apply blusher.
  6. Fill in brows, and use spooly to blend.
  7. Apply eye pencil in and under waterline, mascara and liquid eyeliner.
  8. Finish off my applying lip liner to entire lips.
If you have any questions at all, please leave a comment below or on Instagram.

Thursday 17 August 2017

MAC - Viva Glam Taraji P. Henson Lipstick

When I first saw MAC's new Viva Glam range, I loved the colour of the lipstick but wasn't familiar with Taraji P. Henson, who is the face of this release, but after recently watching Hidden Figures at the cinema, which is Taraji's newest film, I went straight out to buy it! I was also swayed to treat myself as all money from the sales of this lipstick goes towards helping women, men and children living with HIV/AIDS.


This lipstick is a matte medium/dark fuchsia with a pearl finish. It's definitely a statement lipstick when applied directly from the tube, but can be patted on to give a more subtle stain finish.


Friday 14 July 2017

Super-healthy Banana & Raspberry Oat Muffins

If you liked the look of my last recipe (Chocolate & Raspberry Banana Bread) recipe, then I think you'll like this one! For anybody craving something sweet, but wanting to avoid unhealthy treats, then these muffins are a great choice. They're low-fat, nutritious and super easy. You could have a batch of these sat in front of you in 25 minutes (including prep & baking time), and you'll be able to keep those cravings at bay! You could also add a tablespoon on cocao or cacao (raw) powder to make them super chocolatey!


Ingredients:
  • 2 cups porridge oats
  • 3 ripe bananas (mashed)
  • 2 medium/large eggs
  • 1 teaspoon of agave syrup
  • 1 teaspoon baking powder
  • 1/2 teaspoon ground cinnamon 
  • 3/4 cup pitted whole dates (chopped)
  • Handful of fresh or frozen raspberries (no need to defrost)
  • 70% dark chocolate chips (optional)
  • Butter (for greasing your muffin tray)
Method:
  1. Preheat your oven to 180°C
  2. Grease your muffin tin (I experimented with muffin cases to make them look pretty but the mixture will stick once they cool, so I recommend putting the mixture directly in to the tin).
  3. Mix together porridge oats, mashed bananas, eggs, agave, baking powder, cinnamon, dates using a blender or food processor. Alternatively, mix ingredients in a large bowl with a fork, then use a hand blender. Once mixture is combined, add 3/4's of the raspberries and dark chocolate chips and stir through (leave some chocolate chips and raspberries aside for the top).
  4. Pour mix into muffin cases (you should have enough mix for 10-12 muffins).
  5. Top with left over raspberries and chocolate chips.
  6. Bake for 15-20 minutes until firm and slightly golden.
These muffins are so delicious with peanut butter, or you can eat them on their own! Can be kept in the fridge for up to 3 days (if they last past day one)! 

Thursday 30 March 2017

Nars - Velvet Lip Glide in Playpen


As soon as I heard that NARS were launching a brand new range of lipsticks, I was excited to try them. I googled swatches of each shade and bravely ordered one without trying it (which I rarely do). The shade I ordered was 'Playpen' and luckily it was a good choice as I love it. NARS describes the colour as 'lychee pink', but I think it definitely does lean towards more of a coral colour, making the perfect shade for Spring!

The consistency is lovely, it feels moisturising but not sticky. The formula is pigmented and is a cross between a liquid lipstick and a gloss. The doe-foot applicator makes it easy to apply and to create a defined lip line, and I don't need to use lipliner with it.


Unfortunately, it isn''t very long-wearing but for this type of product, I am not surprised. After a while, they do dry down slightly to be a little less shiny, but I wouldn't go as far as to say 'semi-matte', but maybe that's just this colour. I also find that this lipstick makes me lips look plumper.

All in all, I really like the product, and I am tempted to get another couple of them. I really love the look of 'Bound' and 'Suck' - such cheeky names!

There's some great swatches of each shade on Temptalia.com if you don't have a NARS counter near you.
 Nars - Velvet Lip Glide (Playpen) - £22.00


Monday 27 March 2017

Charlotte Tilbury - Pillow Talk Lipstick & Lip Cheat

I was lucky enough to be treated to this beauty for Valentine's Day this year, and it has quickly made itself in to my top five lipsticks of all time (and I have a lot)!


I bought Charlotte Tilbury's lip cheat in 'Pillow Talk' for myself sometime last year and every time I wore it, I thought to myself "this would make a great lipstick", even experimenting with making my own makeshift lipstick by applying it all over my lips and adding a little balm because I loved the colour so much. So when I heard that Charlotte Tilbury had released an online exclusive lipstick called 'Pillow Talk' which was supposedly the same shade as the lip liner, I knew I wanted to add it to my makeup collection. Luckily for me, my hint-dropping to my boyfriend didn't go unnoticed...

The lip liner is a lovely smooth velvety texture and can be used to re-shape and enhance your lips. I use it as a liner for my lips and I also fill in my lips and apply the matching lipstick over the top, which makes it last longer. It's waterproof and is transfer-resistant, claiming to last a whopping 6 hours (depending on quite how much you plan to eat, drink or kiss)!

'Pillow Talk' is my second Charlotte Tilbury lipstick, and the formula is described as a 'Luminous Modern-Matte'. The shade is a beautiful nude pink, and it looks absolutely amazing on every skin tone. The website shows the lipstick on ten women, so although the lipstick is available exclusively online, you can get a good idea what the shade would look like on you from the website, and you could also head to a Charlotte Tilbury counter and apply the lip liner in the same shade so you can see if you'd like the lipstick. You can read the review of the other gorgeous shade I own, which is called 'Super Cindy' here. 

For a matte finish lipstick, this is hydrating and extremely long-wearing. It contains orchid extract and glowing pigments which claim to create the illusion of lit-from-within lips, which make your lips look wider and fuller, which I have personally found to be true. This lipstick glides on beautifully and is easy to apply due to its square angled tip, which is a big bonus.

These lipsticks don't come cheap, but if you're looking for a 'your lips but better' kinda shade, then could be the perfect option for you! 


Top - bottom: Charlotte Tilbury Lipstick (Pillow Talk) & Lip Liner (Pillow Talk)
Have you tried any Charlotte Tilbury lipsticks? What are your favourite shades?


Monday 20 March 2017

Top 3 Concealers for Spring/Summer

It helps us out when we're having a bad skin day or haven't had enough sleep, and let's be honest, we owe it more credit! Concealer has to be one of my favourite makeup products, and I rarely leave the house without any on. Foundation is great for doing most of the hard-work but sometimes we need a little extra helping hand. That's why I've put together a review of my favourite three concealers. You've probably heard a lot about them already, but there is good reason!


I think this concealer has to be my favourite out of the three, due to it's flawless coverage that leaves a luminous, semi-matte finish. It is very lightweight yet buildable and doesn't enhance any fine lines, making it perfect for use under the eyes, which is what I usually use this product for. It conceals and brightens any under-eye darkness beautifully, but it is absolutely perfect for using on blemishes too. Due to it's consistency, it can be used for a natural look if blended out, or a full coverage flawless look. I apply this directly to my skin using the applicator and then use a combination of my ring finger and a beauty blender to blend out. For me, there is absolutely no negatives about this product, apart from the shade range which is fairly limited with eight options. However, if you can find a shade that works for you, then I highly recommend you try it! This is one of those products that I will re-purchase again and again.

NARS - Radiant Creamy Concealer - £23.00 6ml (Chantilly & Custard)

I initially thought this product wasn't worth the hype when I first tried it in Space NK last year. I didn't buy it and forgot all about it, but after hearing so many people still raving about it, I thought I'd try it again, and this time, I loved it. I think I may have tried it when my skin was a little drier but with a good base of moisturiser and eye-cream, this product deserves the reputation it has earn. The coverage is medium-high and buildable and again, is great for under the eyes and for blemishes. 

Unfortunately, there aren't many options for people with light skin and yellow undertones like myself (there are 16 shades in total). As you can see from the swatches below, I own Chantilly (the palest) and Custard (the next yellow toned concealer) and there is a huge difference. I tend to mix the two but this is a very pricy way to do it! This concealer is long-wearing but I have to disagree with NARS' claim that the product is crease-proof. As the concealer is quite a thick consistency, unfortunately I do find it tends to crease and does tend to enhance some fine lines around my eyes. I have to ensure that I use a beauty blender to really work the concealer in to the skin to avoid this as much as possible.

After hearing that there was a high-street dupe of this product, I went to Boots to try it (Maybelline Fit Me Concealer), but it really disappointed me! I don't personally think it is a dupe as it isn't as thick and doesn't provide the same coverage or longevity. I would personally prefer to pay more for a higher quality product and use less of it, but if you are looking for a similar product and don't want to spend £23.00 then it's worth a swatch!


This concealer has also earned itself a great reputation amongst makeup lovers, and for good reason. It gives a really lovely, smooth, flawless looking finish, helping to conceal blemishes, pigmentation and under-eye darkness. It's also extremely long-wearing, water-resistant, transfer-resistant and there are 16 shades available. What's not to love? 

This concealer blends beautifully on bare skin and into foundation when you need a little extra coverage. It can be applied using fingers, a sponge or a brush but I prefer to use my finger to apply and then blend out with a beauty blender. 

I have a love/hate relationship with the packaging. The glass tube is hygienic as it comes with a little pump rather than an applicator like the other two concealers in this post, but the pump ejects too much product so you have to press very lightly to get a half pump out, or you end up with too much and it gets wasted. This style of packaging also means that the product is really hard to get out once it gets low, which is frustrating when you can see that there is still product left.

It is the cheapest of the three concealers and you get more product so although it is still pretty pricy compared to high-street alternatives, it is a really fantastic product and I do think it's worth the money!

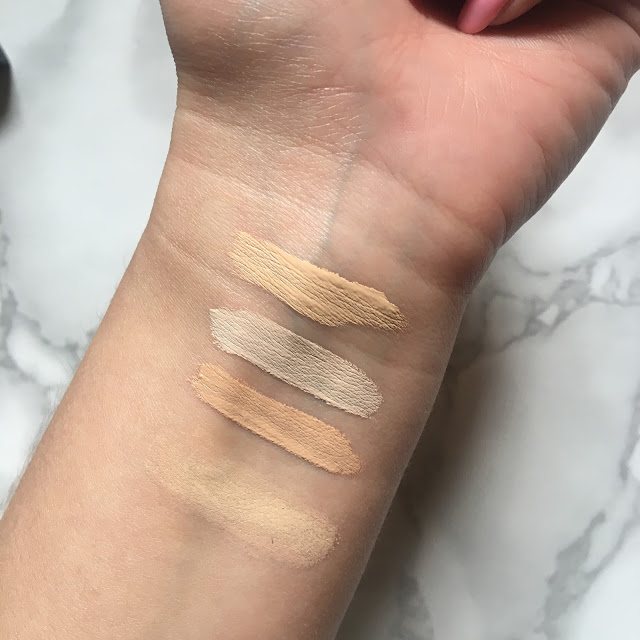
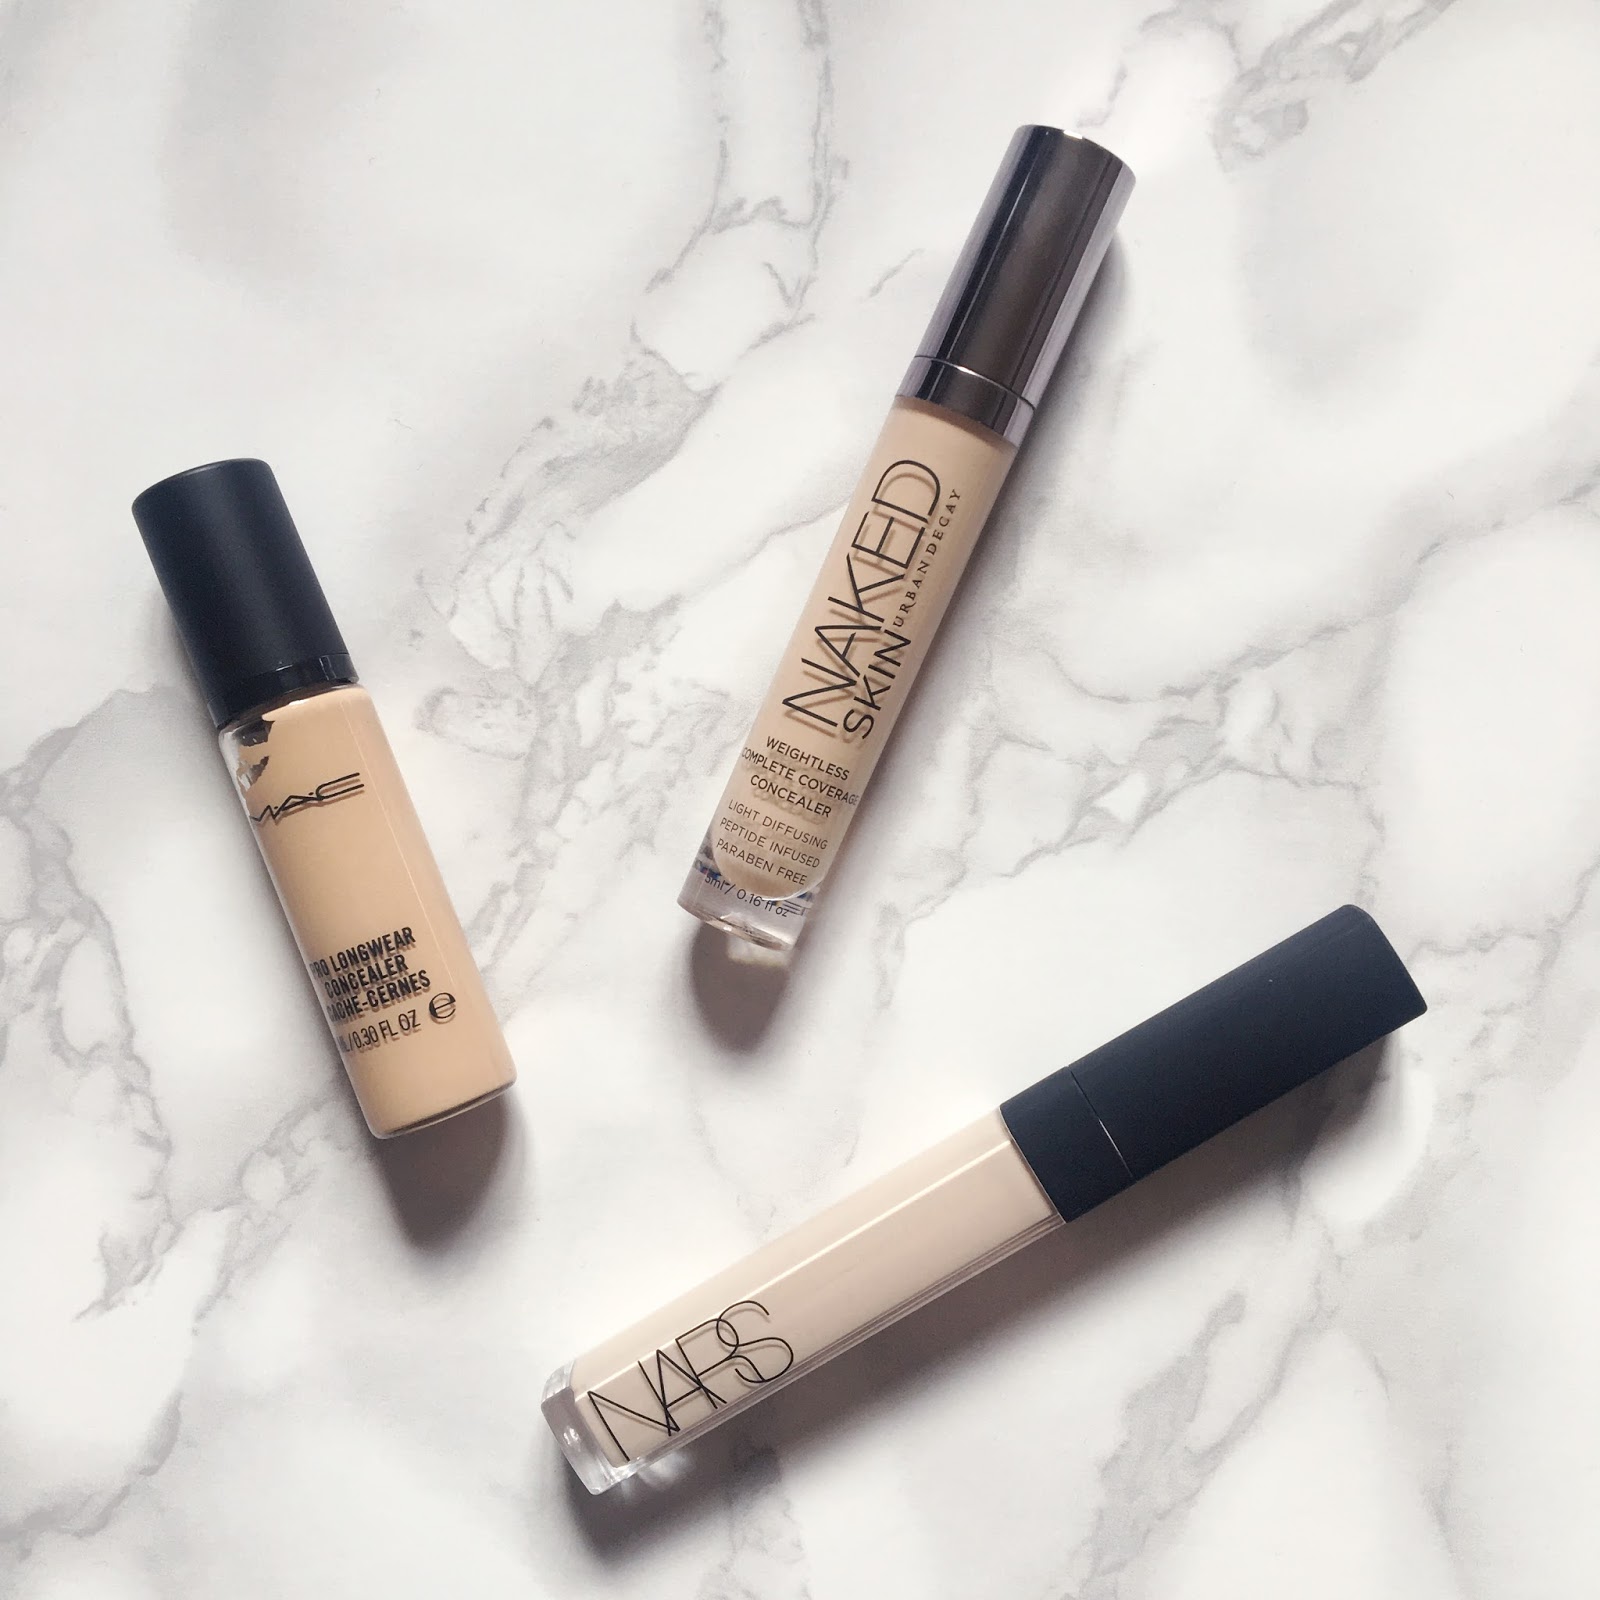
Urban Decay Naked Skin Weightless Complete Coverage Concealer (Light Warm), Nars Radiant Creamy Concealer (Chantilly & Custard) & Mac Pro Longwear Concealer (NC20)
Have you tried any of these? What are your thoughts?

Wednesday 15 March 2017

YSL - Touche Éclat Blur Primer

Some bloggers swear by primers for long-lasting makeup. I personally am yet to make my mind up regarding the difference the primers I have used make to the longevity of my makeup but they definitely help create a smooth base for makeup application and therefore in my opinion are an important step in creating flawless foundation. 

As soon as I saw YSL's Touche Éclat Blur Primer at the YSL counter, I knew I had to have it. The packaging is gorgeous and the product shown in the clear glass bottle is a golden sparkly dream. 


This primer claims to even the look of skintone, blur pores and fine lines and help makeup last longer. It's a gel like consistency and a you only need a little. You can wear under foundation or on it's own on a low-key day. Although the gel contains small golden sparkle, once this is on your face, it's barely noticeable and makes your skin look natural luminous and lovely. 

After I moisturise, I squirt a pump of primer on to my hand and spread evenly across my face using my fingers. I recommend waiting about 30 seconds before you start to apply your foundation, just so the primer can set a little.

This primer definitely creates a silky smooth canvas for makeup, and smoothes out my pores. I also find it prevents my foundation caking like it would without a primer, but like I mentioned earlier, I'm not quite sure yet if it makes it last longer!

Have you tried it? What do you think?

Wednesday 8 March 2017

Chocolate & Raspberry Banana Bread Recipe

If you have some serious cake withdrawal but don't want to over-indulge, then this is the perfect guilt-free treat to curb those cravings. It's high protein, gluten free and absolutely delicious. I would actually choose to eat this over a slice of chocolate cake, and that is saying something!


Ingredients:
  • 1.5 cups ground almonds 
  • 1.5 cups coconut flour
  • 1 teaspoon baking powder
  • 1 teaspoon baking soda
  • 1/2 teaspoon sea salt
  • 1/4 cup cocoa powder
  • 2 ripe bananas (mashed)
  • 3 eggs, beaten
  • 1/4 cup almond/peanut/cashew butter
  • 3 tablespoons agave syrup
  • Frozen raspberries (no need to defrost)
  • 1 cup 70% dark chocolate chips
Method:
  1. Preheat your oven to 180°C
  2. In a medium sized bowl, combine the ground almonds & coconut flour, baking powder, baking soda, sea salt, and cocoa. Stir until it's combined.
  3. In a separate bowl, mash the bananas with a fork until smooth.
  4. Then mix eggs, nut butter, and agave syrup in with the mashed bananas.
  5. Add the dry ingredients to the wet ingredients and whisk until fully combined.
  6. Add dark chocolate chips and frozen raspberries, keeping some of each aside for the top.
  7. Line a baking tin (preferably a bread loaf tin) with baking paper.
  8. Pour the mix into the lined tin.
  9. Drizzle some additional nut butter on top for decoration and sprinkle with leftover chocolate chips and raspberries. You can also slice an additional banana up and lay on top.
  10. Bake for 40-45 minutes or until firm. 
Approximately 250 calories per slice (1/10th).

I'd love to hear what you think of my recipe! Any questions, please let me know!

Friday 3 March 2017

Liz Earle - Botanical Shine Nourishing Hair Oil

Hands up if you want luminous, healthy hair!?

Last year, I purchased the Ojon Rare Blend Oil, which I loved, but after finding it increasingly difficult to find (it was out of stock in all stores and sites) and being pretty expensive, I went on the hunt for a new holy grail hair oil, that would give me moisture and shine without weighing my hair down.

Throughout the years, I have experimented with a wide range of hair products and oils, that make promises that they can't seem to keep, either making my hair look greasy, weighed down or generally making no difference whatsoever...but after reading the endless positive reviews of Liz Earle's Botanical Shine Nourishing Hair Oil, I was sold, and it went on my Christmas list. I was lucky enough to receive this as a gift from my grandma and I am so glad I did as I absolutely love it.


Not only do you get a whopping 50ml worth of product (Ojon's oil was just 15ml), but it makes my hair look and feel silky, shiny and keeps it in amazing condition. Plus, it smells ridiculously good and protects against heat damage! The oil contains melon seed oil, coconut oil and radish seed oil, which are known for the softening and moisturising properties.

I squirt a pump or two of oil on to my hands and then spread evenly through the mid-lengths and ends of damp hair after I have washed it. I then blow dry it and style as usual. You can also use on dry hair for a bit of extra moisture and shine!

I don't get my hair cut as often as I should as I love to keep it long, so this oil really helps keep my split ends in check. I personally have quite fine hair, but this oil is suitable for all hair types so I would recommend anybody to try it if you haven't already! I am in love!

£17.25 - Available at all Liz Earle counters and online.

Thursday 2 March 2017

Top 3 Foundations for Spring/Summer

I can never make my mind up about what level of coverage and finish I want from my foundations. Some days I want something completely full coverage that will make my skin look flawless, and other days, I really want my skin to look like my own skin but a little bit better. My skin changes every time the weather does and this leads me to continue (what feels like) a lifelong mission to find the perfect foundation and I know I'm not the only one! We always seem to think the grass could be greener but I keep coming back to these three foundations, which are not only fantastic for all year round, but they all lend themselves particularly well to Spring/Summer makeup looks. Whether you follow the meteorological or astronomical seasons, there is no doubt that Spring is either here already or just around the corner (finally!), so I thought it was a good time to share these beauties!


NARS Sheer Glow Foundation is a dream as it gives the most gorgeously radiant satin finish, which is perfect for summer! It's hydrating, which is so important in the warmer months as your skin is battling with changes in temperature, including air conditioning. NARS even claim that this foundation will improve your skin's brightness and texture if used daily due to the anti-oxidants and turmeric extract it contains.

Sheer Glow is available in 19 shades, but I would recommend trying in-store rather than buying online as some of the shades seem to be in a strange order. For example, Light 6 (Ceylon) should be darker than Light 5 (Fiji) if you use their guide, but in fact when swatched it's the opposite! 

Nars recommend warming the foundation in the hands and applying with fingers so that the foundation can really melt in to the skin, but I think the foundation works just as well with a beauty blender, although obviously there is some wasted product with this method.

This foundation is recommended for normal, normal-dry and dry skin types so I wouldn't suggest it for oily skin as it is a hydrating foundation. The only negatives are that a pump isn't included (you can purchase one separately for £3), it does oxidise so be aware that it might suit you to order a lighter shade, and it doesn't contain any SPF.

Pros:
  • Buildable coverage
  • Makes skin look radiant
  • Good range of shades
  • Long-wearing
  • Fragrance-free
  • Hydrating

Cons:
  • Oxidisation
  • No pump
  • No sun protection


MAC's Face & Body Foundation is a very sheer foundation, which feels moisturising and lightweight on the skin, making it perfect for a fresh and natural summer makeup look. Although this foundation is low coverage, it is definitely buildable and leaves a really lovely natural skin-like finish. Even close up, this foundation is barely visible and blends seamlessly into the skin. 

My favourite way to use this foundation is to apply over my entire face using my fingers (brushes and beauty blenders soak it up due to it's thin consistency), then I precisely conceal any blemishes using a high coverage concealer, which gives the extra coverage where I need it, without losing the 'my skin but better' look. I also love to mix it with heavier coverage foundations to create a custom coverage.

There are 13 shades available and my pictured shade is C1 (the lightest yellow toned shade) but I am closer to C2 at the moment. You can also get a larger version of this (120ml) for just £29.50 so if you like it, it's definitely worth getting the larger size. I find MAC to be really good with giving samples of foundations so don't be afraid to ask for a pot of it so you try it out at home! I always do this as I like to apply a foundation myself so I can see how it lasts and gives me the chance to see it in natural light. I never trust department store lighting!

Pros:
  • Natural finish
  • Buildable coverage
  • Doesn't oxidise

Cons:
  • No sun protection


Don't let the fact that this is called a 'tinted moisturiser' put you off, because it actually gives more coverage then MAC's Face and Body, which is why I've included it in this foundation post. It gives more coverage than any tinted moisturiser I've tried and glides beautifully on to the skin.

This product is fantastic for wearing during the day in the Summer due it's SPF30 protection and it's also infused with naturally derived botanicals and ingredients that hydrate your skin. NARS claim that this product can also reduce the appearance of hyper pigmentation and dark spots. I love how NARS combine skincare into their foundations, so not only does the foundation make your skin look great instantly, but it should help your skin to look better without makeup too!

Pros:
  • SPF30
  • Easy to blend
  • Buildable coverage
  • Hydrating
  • Fragrance free
  • Non-comedogenic
  • Oil-free

Cons:
  • Oxidisation
(Top-bottom): Nars Sheer Glow (Fiji), MAC Face and Body (C1) & Nars Tinted Moisturiser (Alaska). 
Have you tried any of these foundations? What do you think? Have you found anything that prevents the NARS products from oxidising?

Tuesday 28 February 2017

Pancake Day: Guilt-free Superfood Wholemeal, Vanilla & Cinnamon Pancake Recipe

I have been addicted to pancakes recently and have been having them most Saturdays for the last few months as a treat (I prioritise sleep over having a nice breakfast during the week) and by tweaking the batter and the toppings that I use every time, I think I have finally cracked the perfect pancake!

Although my diet is not dairy-free, I try to avoid it when alternatives can be used, so I use almond milk in my pancake mixture along with fibre-rich wholemeal flour, with toppings such as chia seeds and cacao nibs to put a super-food twist on the classic pancake. These extras are of course optional and the mixture ratios work just as well with white flour and cow's milk.

My toppings of choice for this particular batch (below) were cacao nibs, a healthy alternative to chocolate sauce (see ingredients list), a little natural yoghurt, raspberries, orange and kiwi, which created a lovely fruity tropical flavour. However, banana, strawberries & blueberries are just as delicious. Find your favourite combination and have fun with it!


Ingredients:
Method:
  1. Crack egg into large mixing bowl, then sieve flour into bowl and add milk.
  2. Add vanilla and extract and ground cinnamon (optional).
  3. Whisk ingredients together until a smooth batter is formed.
  4. Put 1 teaspoon of oil into a large frying pan on a medium heat and tilt pan to ensure oil is spread evenly.
  5. Add approximately a ladle of batter to the pan.
  6. Cook pancake for 1-2 minutes or until bubbles appear on the surface.
  7. Flip pancake (if you're brave) or use a tool to turn over.
  8. Cook other side of pancake for a minute or until golden.
  9. Repeat this process until you have used all of the batter.
  10. Stack pancakes, add toppings of your choice and tuck in! Voila!

Enjoy! x